Relative Dates :

0
  • Friday, April 13, 2012

  • When you add actual dates to a filter, they are really only useful when the filter is used. If you want to save the filter for later use, you probably will need to modify the date each time you use it.

    To solve this issue, date fields also allow you to enter relative dates, which reflect the time they are used.

    Relative Dates : [m D] {1..N} where :
    •m is the multiplier and
    •D is displacement : Year / Month / Week / Day / Hour / MINute / Second

    Other options: now / today / yesterday


    Example 1: create a filter that shows a data for all issues that were entered more than 1 year 33 days -44 minutes from the time the filter is run.

    Date Entered > -1 Y -13days +44 Min

    Example 2: Find all issues that were closed in the last month.

    Close Date > -1 month

    Metrics : Finding the duration of time that an issue was in a specific status.

  • Tuesday, March 27, 2012
  • A number of customers have expressed interest in finding ways to provide metrics, using the history information that is recorded in issues. The best way to achieve this is to create a custom field to define the information you are looking for (it can be hidden if desired). Then the contents of this field can be accessed in issue details and ultimately in reports. The following classes can be used for advanced user defined fields :

    • FormulaDateCustomUserField - end result is a date value
    • FormulaCustomUserField - end result is a numeric value
    • FormulaIntCustomUserField - end result is an integer value
    • FormulaStringCustomUserField - end result is a text value


    To use any of these classes, you must provide an OGNL formula (see Rank documentation), which is used to retrieve data from the issue history. This formula allows you to access values and methods for the internal BugStruct class for each issue. Some valueable methods for metrics include :

    • // finds the date that the issue was changed FROM a value for a specified field
    • // or (last=true) the last time it changed FROM that value
    • dateChangedFrom(int fieldId, String value1, boolean last)

    • // finds the date that the issue was changed to a value for a specified field
    • // if value2 is not null, it finds when the issue changed from value1 to value2.
    • // or (last=true) the last time it changed to that value
    • // if value1 is null, this will just return when the field was changed (to any value)
    • dateChangedTo(int fieldId, String value1, String value2, boolean last)
    • dateLastChangedTo(int fieldId, String value1, String value2)

    • // find the time taken for an issue to move from one value to another
    • // fieldId : the id of the field holding the desired value. (Reference ids in custom field setup)
    • // Note: custom fields are > 100, default fields <100)
    • // format may take the form of "m", "h", or "d" for (months, hours, or days)
    • elapsedTimeBetweenStates(int fieldId, String value1, String value2, String format)
    • elapsedTimeBetweenDates(Date d1, Date d2, String format)

    I will look at a few examples that have come up in the past few months :

    Example 1: Time taken to move from status A to status B

    - Find the id (SID) of the field that holds the status you are interested in.
    - Define a custom field called TimeTakenAB using the "custom" advanced field option as follows:

    • Custom Class : com.other.FormulaIntCustomUserField
    • Custom Class Formula: elapsedTimeBetweenStates(SID, "A", "B", "d")

    The TimeTakenAB field should now show the number of days that each issue took to move from state "A" to state "B". A value of 0 is given for issues where the states were not found.

    Example 2: Which issues had a field changed to XYZ during the last week.
    - Find the id (SID) of the field that holds the values you are interested in.
    - Define a custom field called DateChangedToXYZ using the "custom" advanced field option as follows:

    • Custom Class: com.other.FormulaDateCustomUserField
    • Custom Class Formula: dateChangedTo(SID, XYZ, null, true)
    • (alternatively) dateLastChangedTo(SID, XYZ, null)

    - The DateChangedToXYZ should then display the desired date.

    Example 3: How many issues were fixed in the last 4 Weeks

    - Find the id (SID) of the status field is 20.
    - Define a custom field called DateFixed using the "custom" advanced field option as follows:

    • Custom Class : com.other.FormulaDateCustomUserField
    • Custom Class formula : dateChangedTo(5,"Fixed")

    - Create a filter that uses a relative date ( ie: DateFixed <= -4 weeks) on this new field. The results should only include the issues you are looking for and the field is available in the details section also.

    Customizing FIT Made Easier

    0
  • Friday, July 08, 2011
  • The developers for FIT have always strived to make end user customizations one of the major benefits in choosing their software. The benefits of customization are :

    1. Being able to customize the appearance of the tool through html and css changes can be as simple as adding a logo and matching the colors of the interface to those of the company. This allows customers to make the software fit (pardon the punn) in an existing web site or match the pages that take the users to it. It also allows you to add html and links to other sites or tools which might be useful to users.

    2. Our workflow feature allows you to define rules about what users can see and which users are able to modify specific fields or issues. It can also be used to control or make modifications to issues based on the values which are saved during modifications.

    3. Language strings can be changed across the tool in the language settings feature where language translations can be modified or created for any string in the system. These strings will localize the product to any language, if someone is available to do the translations. The product is shipped with Spanish, French, German and English base translations.

    4. Complex customizations can be achieved by adding javascript to the product, which opens up an endless list of possibilities. Some common examples are :

    - changing field values based on the current user, or the values of other fields

    - hiding/displaying parts of the page depending on what is currently happening in an issue.

    - adding custom instructions or options to the user for a specific purpose

    One problem that has always been a nuisance to administrators, especially those on hosted systems, has been the ability to upload files where FIT can actually access them. Until now, access to the actual machine where FIT resides, has always been necessary. This meant that the system administrator or FIT team (for hosted systems) has always had to be involved.

    A new upload feature has just been added to FIT which will allow any administrator for FIT to simply upload a file to a public directory served by the system, so it can be accessed directly by the tool. So, if you have a new logo, a pdf with special instructions, or want to store your javascript in a .js file, rather than a custom string, you can now upload them directly to your server, where they can be accessed by FIT immediately. You no longer need to make a request to your IT tech or to the FIT team. (hosted systems)

    Example:

    A recent request came in about how to customize the favicon file which is used for the URL icon in the browser address bar.

    This image is configured by changing the sFAVICON custom string. If you have a proper .ico file that you would rather see in the address bar and on browser tabs, you can upload the file to FIT and then change this string to something like the following (since the upload goes to public) :

    This is equivalent to the following (leave out the port if you are redirecting through apache) :

    ** Note: the two lank tags above should actually be "link" this blog would not allow me to format link tags properly within the text.


    FIT TIP #2

    0
  • Friday, June 17, 2011
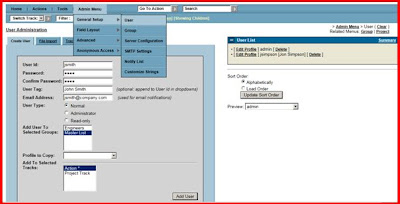
  • CREATING USERS

    Action: Admin Menu>General Setup>User

    Complete the following fields: User Id (the name others will see, you can keep this a short form of their name as it also the name the user will have to login with), Password (user can always change it later), Confirm Password, User Tag (optional, this is where you can put the user’s full name if you want, which will be displayed in brackets after their User Id), Email address (this is the address that their notifications will be sent to). Select their user type. Profile to Copy is handy and can save you a lot of time if you are creating a large number of users and they all have the same profile. Add User to selected tracks is available as an option if you have more than one track. Here you can select which tracks to give the user access. Then select Add User.